Move over Selenium - UI Testing with Cypress
Before we start, of course Selenium has good qualities
This is not a Selenium bash but a specific case of using it for a time and finding Cypress could be better in some situations. Selenium has some great qualities:
- Cross-browser: There are drivers for most browsers
- History: It has a rich ecosystem since it’s been around since 2004
- Options: It runs on Sauce Labs and on Real Devices
Setting the stage, evaluating Selenium frameworks
We moved from Ruby to Node.js for our UI tests. We spent a couple of months evaluating JS frameworks related to UI testing and Selenium specifically. Some of our evaluations:
- http://webdriver.io/
- http://nightwatchjs.org/
- https://github.com/admc/wd
- https://www.npmjs.com/package/selenium-webdriver
- http://appium.io/
- https://github.com/segmentio/nightmare
- https://theintern.io/
We opted to write extensions for what we needed and build out our own framework since we wanted to do mobile testing and use WD.js which was used by Appium at the time.
Challenges with Selenium, Getting Everyone Writing UI Tests
The overarching goal is to have the entire team write UI Tests.
Typically you’ll have an Sdet (engineer specializing in quality) along with developers building features. Our goal was to have all developers write UI tests not just the sdet.
We focused on getting more developers to maintain and write tests. They would do it if forced but it wasn’t something they found value in. We spent most of our time figuring out sleeps/waits and even when something was easy it took some effort to find why the test broke.
We struggled to get wide adoption in teams for writing UI tests. Therefore scaling with more developers was not going to work.
Even with all of the extensions, improvements and wrappers we built into our custom framework developer interest remains low and maintenance remains high.

Some of the problems we encountered:
- Setup
- We found narrowing down to the right choice took a great deal of effort due to the plethora of technologies to evaluate.
- There are dozens of js frameworks and combinations of runners. Contrasted with Cypress which gets you started immediately.
- It takes considerable effort to research and get started since you want to get a good fit for your team.
- We built tooling around launching UI tests but it proved difficult to run locally.
- We found narrowing down to the right choice took a great deal of effort due to the plethora of technologies to evaluate.
- Learning Curve
- We found it took considerable time to become proficient writing and debugging tests.
- You launch your test and watch it run while looking at console output. It takes time to train yourself to understand the output at the speed the test runs.
- Since you can’t visually look at every step slowly side-by-side with console output it requires you to re-run multiple times to catch why it broke.
- We found it took considerable time to become proficient writing and debugging tests.
- Finding and clicking on elements
- The classic problem facing any UI test is the dreaded sleeps/timeouts (flakiness)
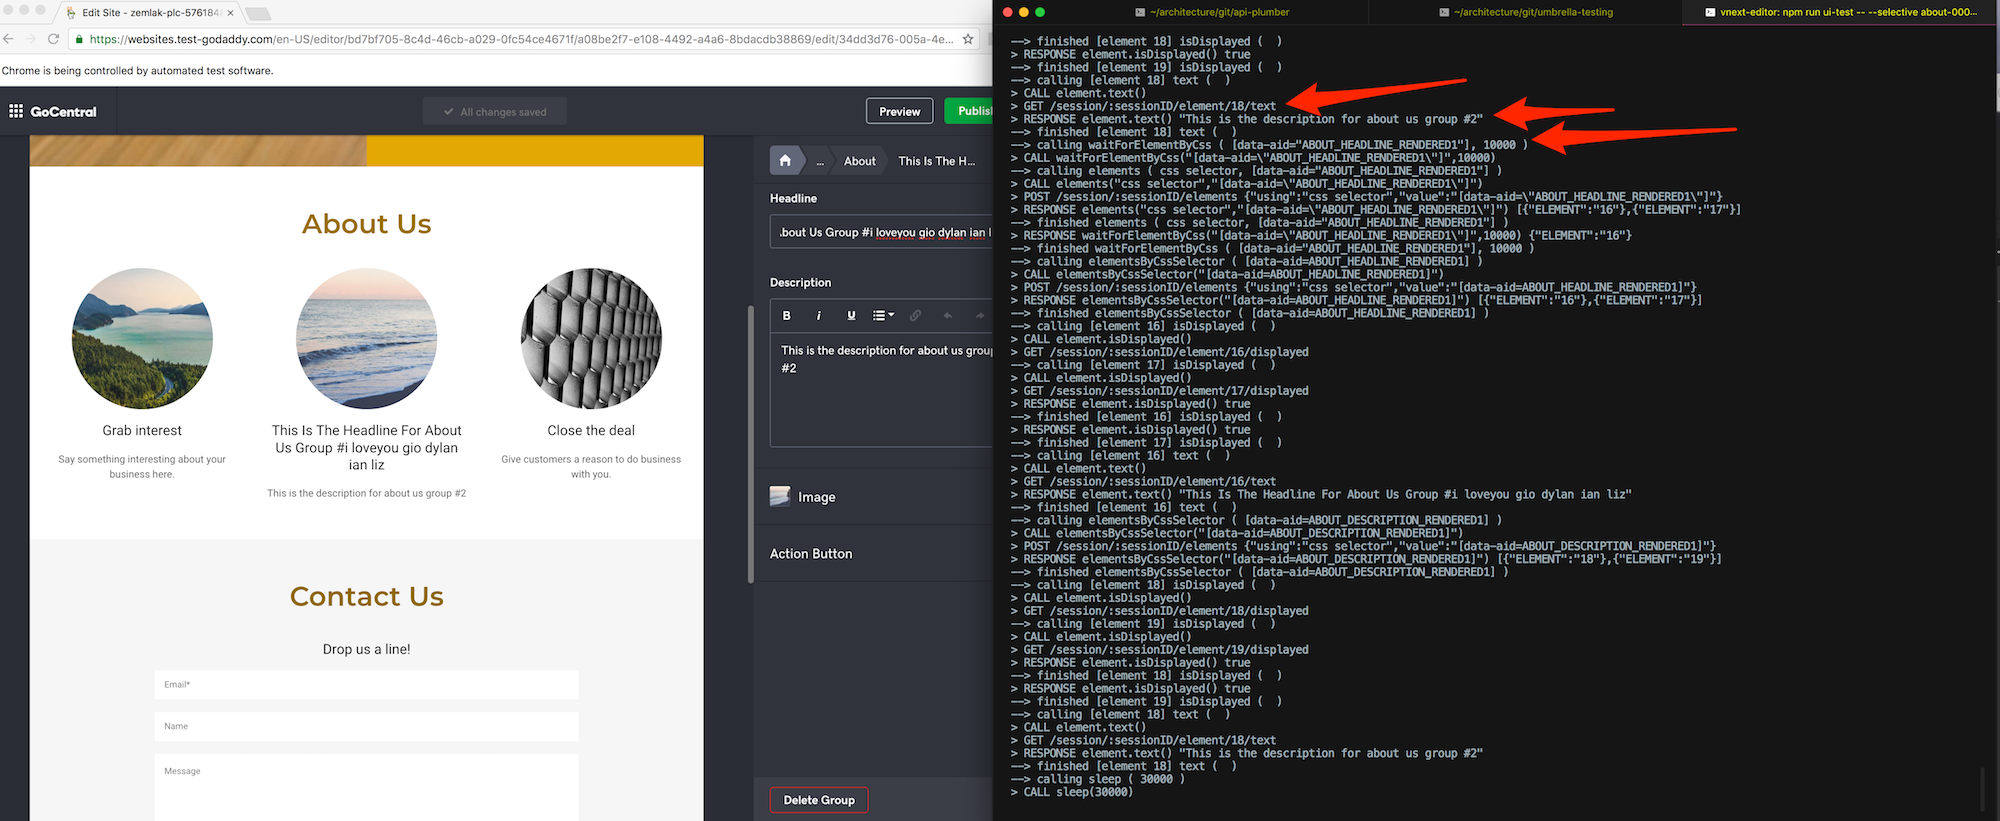
- Sometimes flakiness in tests comes from those waits for transitions or waiting for the dom to load an element. You attempt to send a click to specific coordinates, however, since you are sending a command through a driver to the browser, it could be something changed in the browser, i.e., the element moved location.
- The architecture is based on a command -> driver -> browser
- This architecture can result in some issues like the find element described above.
- As noted you write your test and tell the driver what you want. The driver tells the browser what you want. Then the loop completes and you get a response. The commands don’t run in the browser so they don’t have access to any browser information to help your test respond if anything changes.
- Please note you can exec js with Selenium, but the comparison is in architectures, overall.
- The classic problem facing any UI test is the dreaded sleeps/timeouts (flakiness)
Solutions with Cypress
Our team piloted a project using Cypress to see if we could overcome some of the challenges mentioned above. The goal of this post isn’t to convince you not to use Selenium but to describe some of the things we found useful with Cypress that may help overcome some objections you might receive in trying to scale and strengthen your UI testing.
Cypress provides detailed guides to get started but we’ll highlight a few steps below to help summarize.
Easy Installation
Cypress can be easily installed with npm. Create a directory for your Cypress solution and install Cypress.
$ npm install cypress --save-dev
Everything you need to start writing tests with Cypress will be installed for you within seconds. Once the installation has finished, open Cypress (note: you will use npx since the Cypress node module has been installed within the current directory).
$ npx cypress open
The Cypress Test Runner will load with a pre-loaded set of tests which run against a Cypress example application.

Clear Documentation
In addition to the detailed guides provided on the Cypress website, Cypress provides a search capability on their documentation site helping to find answers quicker.

Similar to Selenium, Cypress is also open source which has allowed us to look at their code to find how it works and provided insight into issues others have run into providing potential workarounds until the issue can be resolved properly. What sets it apart from Selenium is that all of the source code you need is in one place. There are no other drivers or tools in other repos you may need to go hunt for.
A dedicated Cypress room on Gitter has proved valuable to find information as well. Cypress team members actively respond to questions there and the search functionality provides history of past questions and answers. There are several Selenium resources on Gitter as well but the abundance of rooms can make it noisier to find the right answers.
Simple methods
Consider the following code (taken from cypress.io):
describe('Post Resource', function() {
  it('Creating a New Post', function() {
    cy.visit('/posts/new')

    cy.get('input.post-title')
      .type('My First Post')

    cy.get('input.post-body')
      .type('Hello, world!')

    cy.contains('Submit')
      .click()

    cy.url()
      .should('include', '/posts/my-first-post')

    cy.get('h1')
      .should('contain', 'My First Post')
  })
})
Notice how easy and simple this code is to understand?!?! The time it takes for someone to become familiar with how to write Cypress tests is minimal. The learning curve is drastically reduced by:
- Simple commands like
.visit(),.get()and.click() - No additional overhead to determine if a selector is a
idorclasssince Cypress uses jQuery to get elements - Test framework out of the box - no need to include additional testing packages
- Chaining of commands allowing each command to yield a subject to the next command similar to Promises - although not an exact 1:1 implementation. Commands cannot be run in parallel, cannot be forgot to be returned and cannot use a ` .catch()` error handler for a failed command. This ensures tests are deterministic, repeatable and consistent for a flake free user experience.
Finding Elements and Debugging Tests
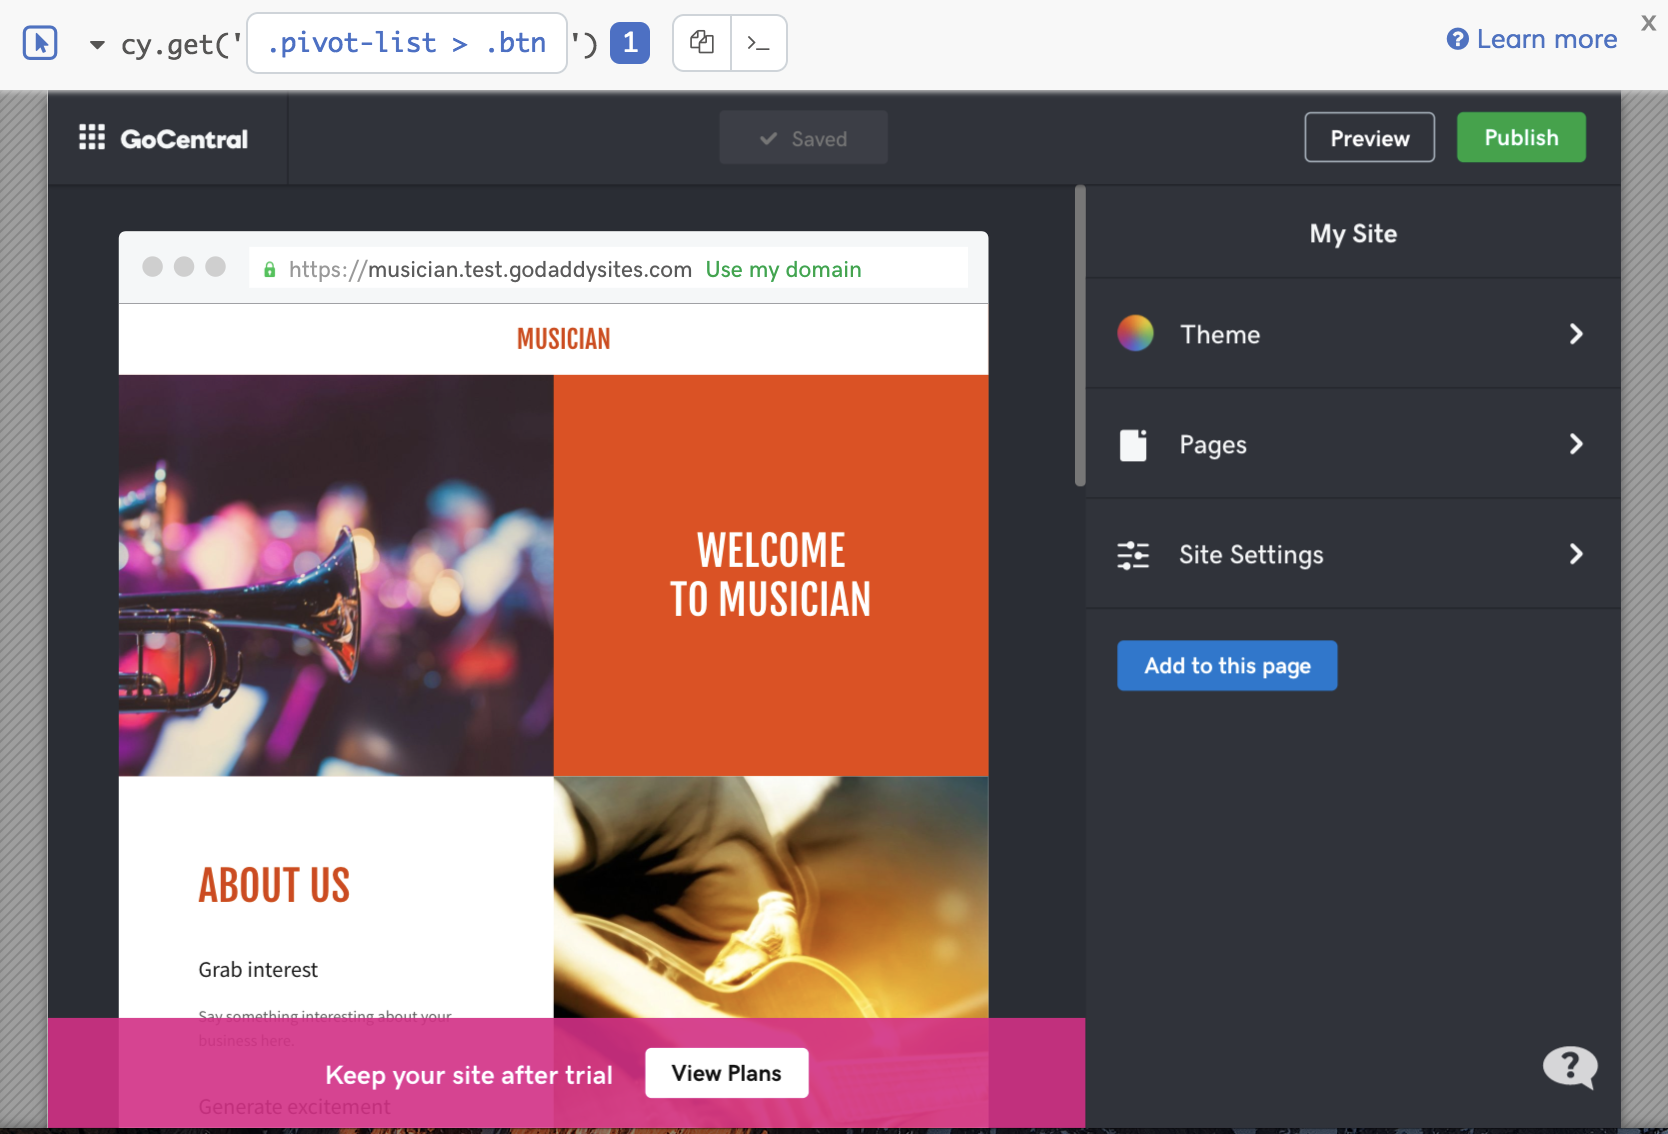
One of the more impressive features of Cypress is the Test Runner. Inside the Test Runner, Cypress offers a Selector Playground that can be used to generate selectors for your tests.

Gone are the days of inspecting elements or hunting through page source to generate a selector. Cypress defines a
strategy of finding the best unique selector and provides the command needed within your test code. In the above
example, Cypress has determined the best selector for the ‘Add to this page’ button is .pivot-list > .btn. The
strategy for selecting elements is customizable. The Selector Playground will also let you free-form type selectors
and show you how many elements match that selector so you can have confidence knowing you’ve created a unique
selector for your element.
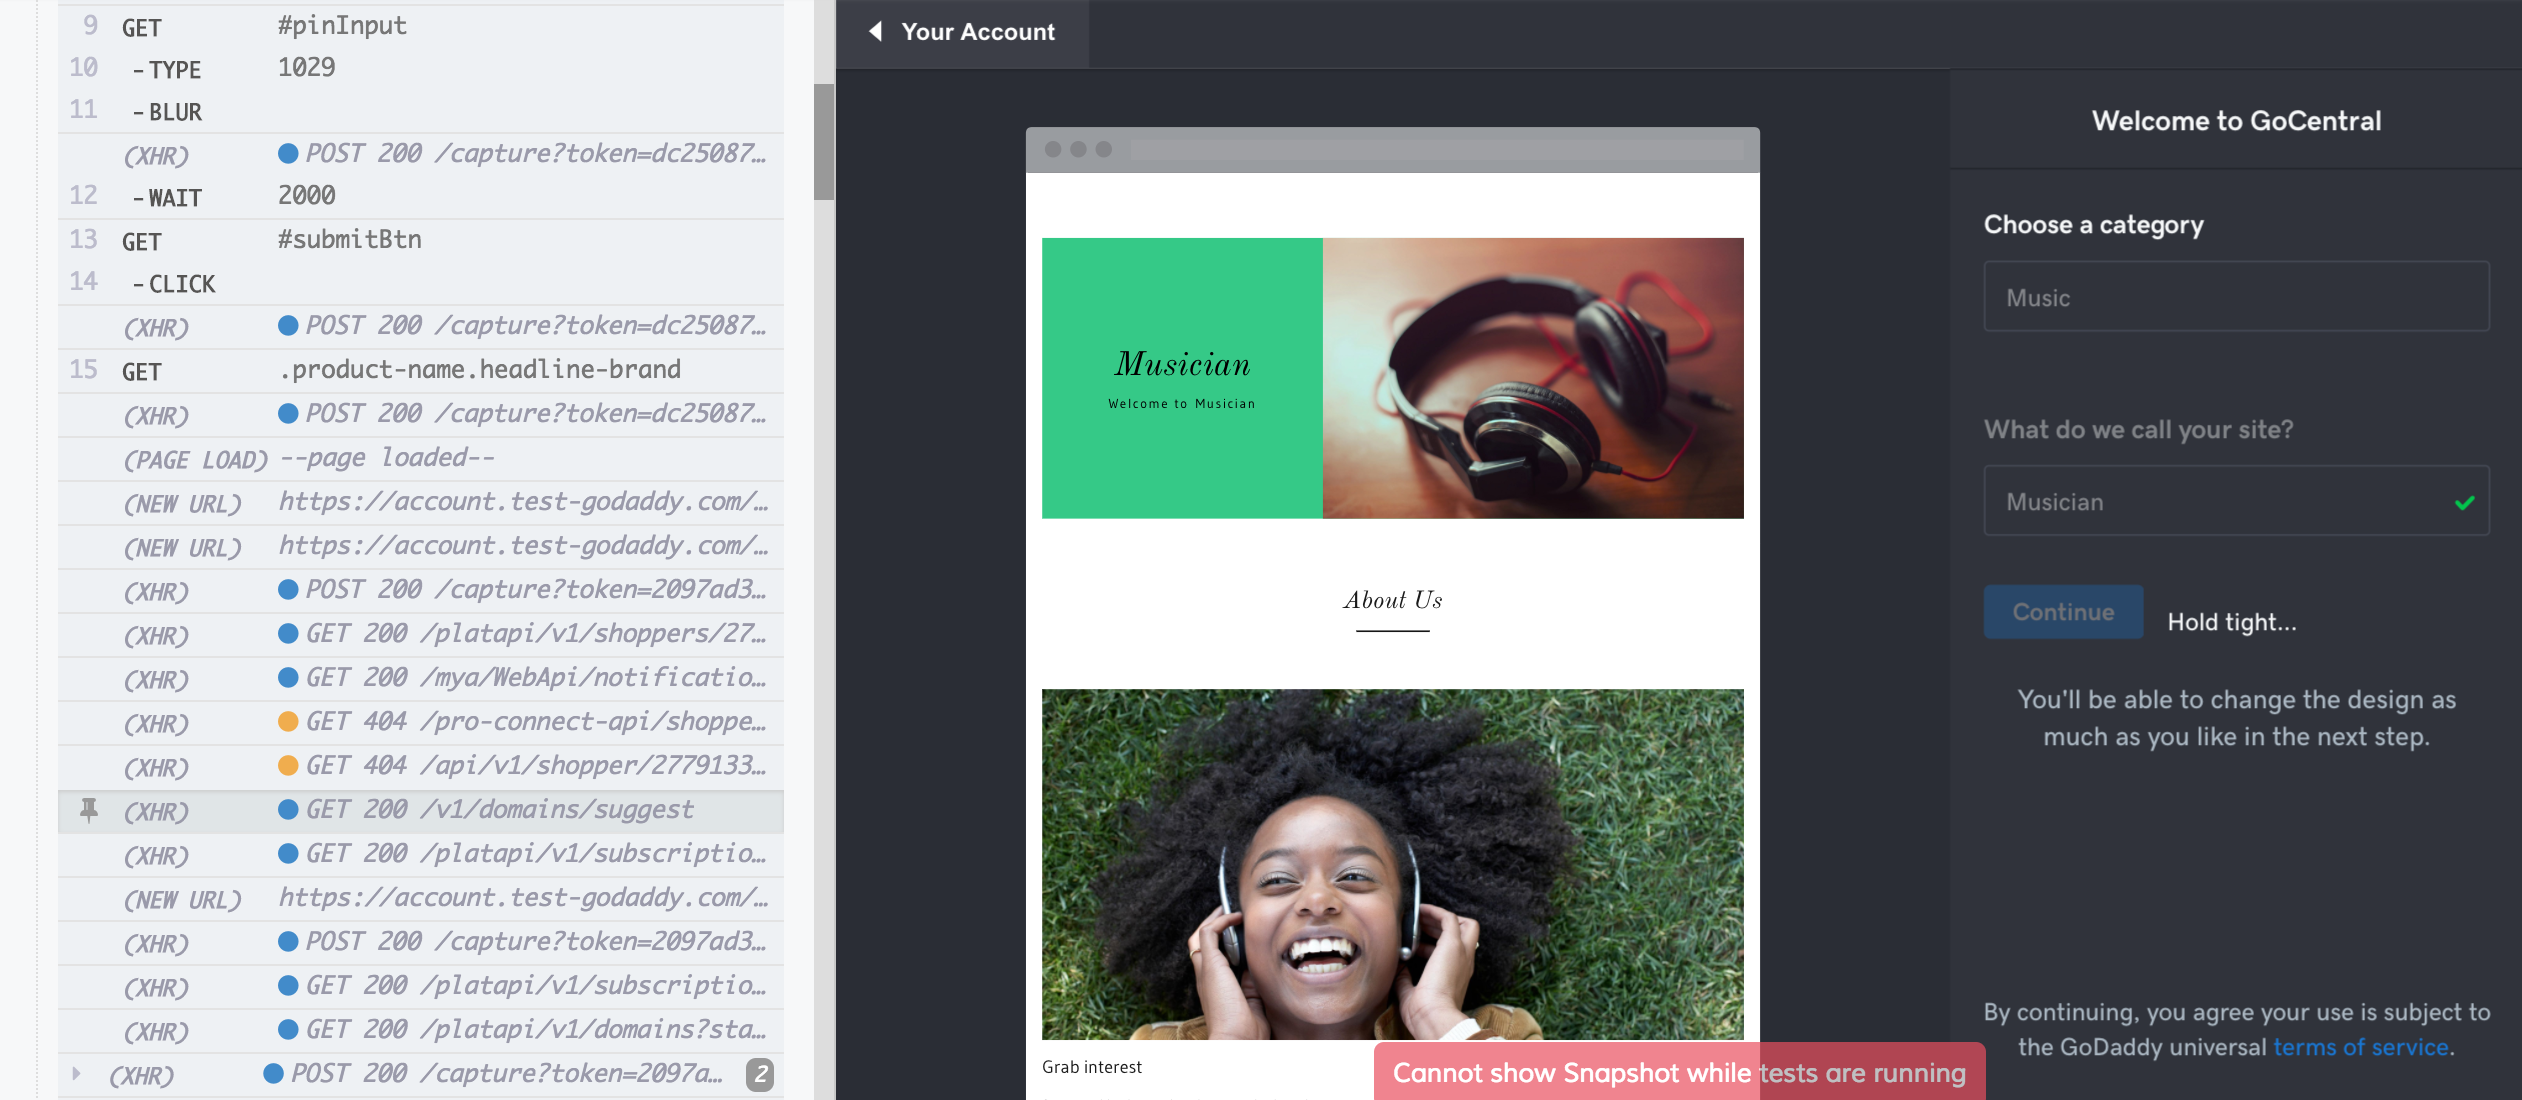
Another feature of the Test Runner is the Command Log which details every step of the test.

On the left side a list of commands will show exactly what request was made making it easy to debug when problems arise. On the GoDaddy GoCentral team, we use a testing environment to verify new features before deploying to our production environment where customers interact with our site. The testing environment has many dependencies on services maintained by teams throughout the company and sometimes one of those services becomes unavailable. In the example below you can see a call to one of our APIs that is returning a 404 response. This allows us to debug our test and inspect the request and response made to determine if our test is working properly.

Mocking Flaky APIs
As mentioned in the previous section, flaky or slow APIs can drag down the efficiency of UI testing. When a service doesn’t return as expected, it’s hard to verify UI functionality. Cypress introduces mocking within your test code to account for this scenario allowing you to have more resilient UI tests.
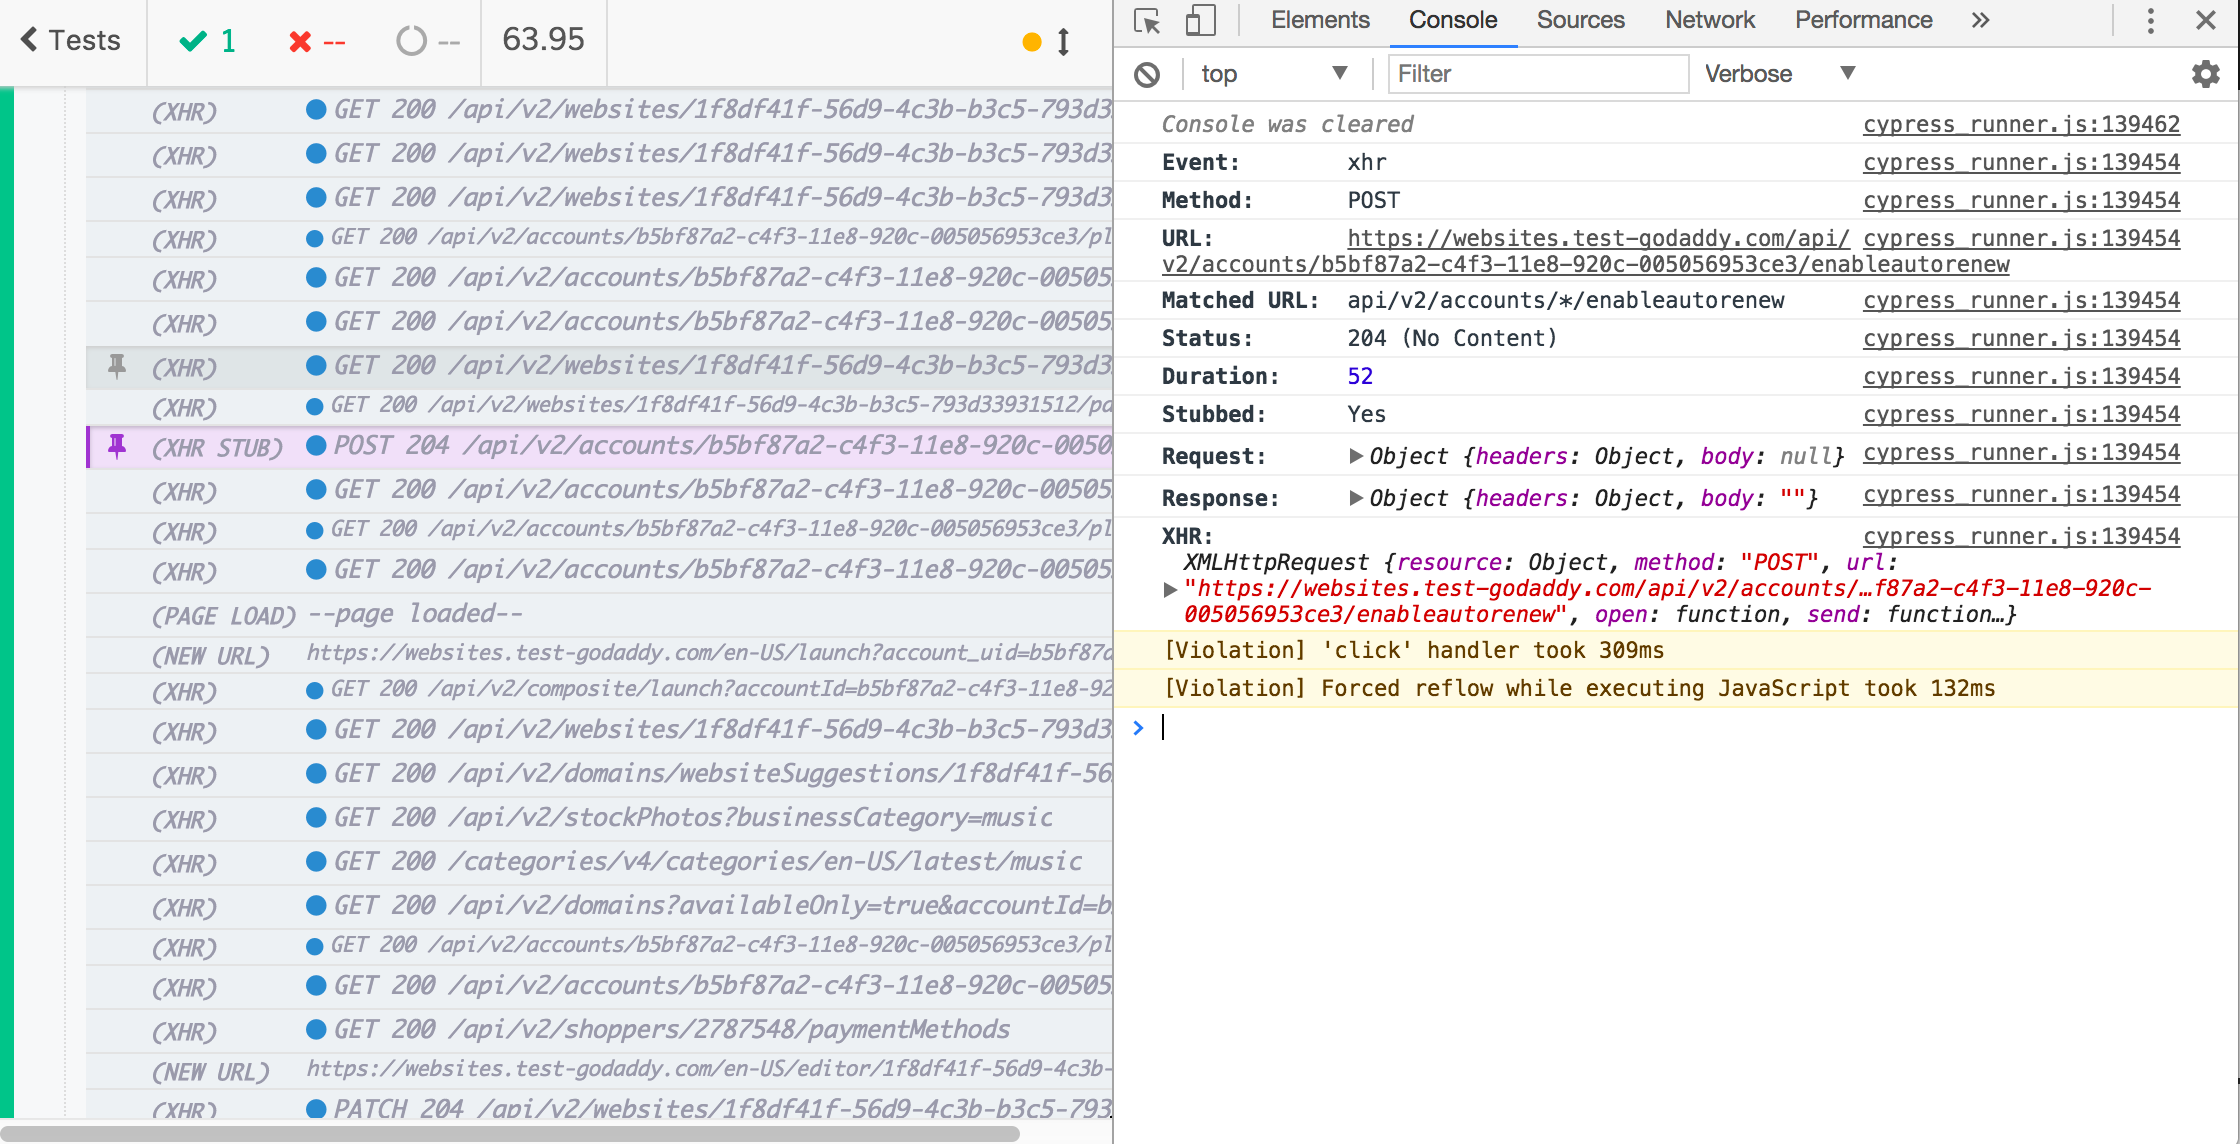
One instance where we use this on the GoDaddy GoCentral team is when calls are made to our billing API. We have a potential race condition when making calls to our billing API due to the fast nature of Cypress tests.
To avoid this race condition, we can simulate the call to the billing API using the .route() method Cypress provides
as shown below.
cy.server();
cy.route({
  method: 'POST',
  url: 'api/v2/accounts/*/enableautorenew',
  status: 204,
  response: {
    enabled: true
  }
});
In the above code, we capture any requests that match the url provided and return a 204 response with a response body. This helps avoid any issue that may occur with the service being called and potentially speeds up the test by avoiding making the actual call to the service. We can also guarantee that our test should never fail because of this race condition. We also simulated the JSON response received from the endpoint. This can be useful when wanting to test various responses without having to setup test data before each test.

Another useful example of mocking responses is to verify UI functionality when things go bad. With Cypress, it’s easy to simulate what an error might look like to a customer when a service outage occurs.
cy.server();
cy.route({
  method: 'POST',
  url: 'api/v2/accounts/*/enableautorenew',
  status: 500,
  response: {}
});
With the above code, we can simulate our endpoint returning a 500 response to verify the customer sees the appropriate error message on their screen

Best Practices (or what we’ve learned so far)
- There’s a knee jerk reaction to blame the test framework (in this case Cypress) for your test failures. 99.9% of the time, the issue isn’t with Cypress - it’s with your code or the test environment being used. Double check you’re approaching your test case the best way.
- Set baseUrl in cypress.json - There are lots of useful things you can configure in your cypress.json file but the
most important is to use a baseUrl. Without it, Cypress does not know the url of the app you plan to test. This opens
a browser on localhost with a random port. When you finally use
cy.visit()it will look like your tests are reloading. It also will rerun any commands issued (in our case, shopper setup) all over again. Use baseUrl to avoid this. - Use separate spec files for your tests. This is especially useful when running tests in parallel or trying to retry tests.
- As of the time of this writing, Cypress does not have a retry capability. The functionality appears to be in development and may be released soon. In the mean time, use a retry script developed by another Cypress user. It’s fantastic and supports running tests in parallel as well.
- If you’re trying to mock a large response object, Cypress doesn’t handle this well. It’s a known issue and a lot of clever Cypress users have found workarounds.
- Lots of things are configurable in Cypress. If you don’t like the default behavior you can most likely find a way to change it through the documentation. Things like network requests getting whitelisted, element selection strategy and default timeouts are all examples of things that can be changed. Side note on timeouts - Cypress does a good job of waiting for things to happen - modify timeouts sparingly to make use of the speed improvements Cypress provides.
We sent out a survey to developers and some quotes from them:
- “Watching it run as it’s happening is fantastic. Much easier to catch something that the test might not immediately see, or be able to stop it without having to wait through the timeout”
- “I’ve used selenium in the past (using capybara and rspec in ruby), but the ease and capabilities of cypress over my experience with selenium makes for an easy choice.”
- “Super easy to write! More of the time was spent just, going through inspector to make sure I was telling the test to click on the right elements”
- “On average it took 0-30 mins I would say. Simpler ones <10mins and complex one 40+mins.”
- “At the start it was little bit of a struggle but as we have added to our Commands and common functions, writing tests has been relatively faster”